Font engineering, Part 2: Build process
In Part 1 of this blog post series, I started setting up a Git repository for one of my horrendous old fonts to explore whether we can adopt good software development practices in a typical font project. At the end of that post we populated a new repository, graham-sans, with a folder structure that suits our needs.
About the graham-sans repository
(Side note: I’m not a fan of the egotistical name. I made the font when I was young and had ideas above my station.)
The repository hosts a FontLab file, GrahamSans.vfc, with Regular and Bold drawn instances. I’ve also configured an instance, Semi Bold, which will be created by interpolating the Regular and Bold drawn instances.
(Another side note: In an effort to use more inclusive terminology I shall be using the term ‘drawn instances’ instead of ‘masters’.)
The drawn instances are exported as UFOs, and a .designspace file ties everything together - it specifies which drawn instances are available and which interpolated instances should be created from them.
Building software, building fonts
Obviously .vfc, .ufo and .designspace files are source files that are used during the design process. Font editors will typically include a mechanism to export fonts to the formats that end users are more familiar with - .ttf, .otf and so on.
In Part 1, I made the decision not to include exported fonts in my repository. We already have all the information we need to create our fonts from our source files - storing the final fonts seems like duplicate information. What we are going to do instead is create a build process to automate the creation of font files from our sources.
Here we find parallels with software engineering. Some languages, such as Rust or C++, are compiled. Developers write source code, and a build process compiles that code into a finished product - typically an executable program that runs on your computer. You don’t need to store both code and end product in your repository. Let’s apply that thinking to our font source files.
Python tools
We’ll use Python to help us on our journey. There are a vast number of open source tools, written in Python, that are available to provide the functionality we need. Firstly, we can use fontmake to convert our source files into .otfs and .ttfs. Then we’ll write a script to convert those files to webfonts using fonttools.
Creating a virtual environment
Running Python on a computer can create all manner of problems. You may want to rely on a particular version of fontmake for your build script, but another script elsewhere on your computer may require a different, incompatible, version. You can’t therefore rely on one system-wide fontmake to handle everything you throw at it. Fortunately Python provides the solution. Creating a virtual environment in your project means you have a nice self-contained version of Python and the specific dependencies you need without fear of contaminating other versions on your system.
Writing a build script
Let’s start our build process by creating the virtual environment. Let’s create a new file in the scripts folder, buildFontsFromSource.sh, and add the following lines:
python3 -m venv .
source ./bin/activate
pip3 install fontparts fontmake gftools
This will create the virtual environment and install the dependencies we need. Next, the export process. We’ll store the files in the build/ folder. Add the following lines:
# Clear out the existing folder
rm -rf build/*
# Build variable fonts, otfs and ttfs
fontmake -m sources/1-drawing/DesignSpace-UFO/GrahamSans.designspace -o variable --output-dir build/variable
fontmake -i -m sources/1-drawing/DesignSpace-UFO/GrahamSans.designspace -o otf --output-dir build/otf
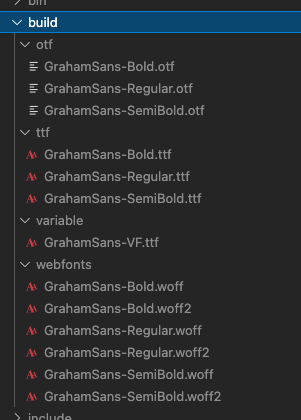
fontmake -i -m sources/1-drawing/DesignSpace-UFO/GrahamSans.designspace -o ttf --output-dir build/ttfRunning this script will give us the fonts we need, organised by folder. We run fontmake three times:
- creating a variable font
- creating three otf files (including our interpolated Semi Bold)
- creating the three corresponding ttf files.
Done! Finally we need to convert the fonts to web fonts, so we’ll use a Python script and fontttools to do the job. Create a new file, scripts/buildWebFonts.py, and add the following lines:
import os
from fontTools.ttLib import TTFont

print('Building webfonts...')
fontFormats = ['woff', 'woff2']

inDirectory = '../build/otf'
outDirectory = '../build/webfonts'

if not os.path.isdir(outDirectory):
    os.mkdir(outDirectory)

for filename in os.listdir(inDirectory):
    if filename.endswith(".otf"):
        font = TTFont(os.path.join(inDirectory, filename))
        for format in fontFormats:
            font.save(os.path.join(outDirectory, filename.replace('.otf', '.' + format)))
This script works through the build/otf directory, converting any font it sees to .woff and .woff2 format.
Let’s add that to our buildFontsFromSource.sh file:
cd scripts || exit
python3.9 buildWebfonts.py
cd ..
And that should do the trick. If we run source scripts/buildFontsFromSource.sh from the command line - fingers crossed! - we should see all our fonts being generated in the build/ folder.
It’s all very simplistic and there’s a lot of scope for refinement but it works!
What next?
Our new script gives us some choices to make. When shall we run it? You may wish to build fonts when you’re ready to make a release. Or, in my case, I want the latest versions of my fonts available for use on my website whenever I make a commit. We’ll delve into continuous integration in a later post but first: how can we be sure that our fonts are even valid? Have we made any big errors in our outlines or our spacing or have we introduced any technical problems that mean our fonts won’t work in some applications? In software engineering this problem is solved - we write tests. And in font engineering we can do the same. Stay tuned for part 3!