Scripting in Glyphs.app: Converting Amiga Bitmap Fonts
Way back in the 1990s, I created a few bitmap fonts on the Commodore Amiga, notably Webcleaner, a set of fonts for early web browsers. Technology moves on, and I was concerned that my handiwork would be lost forever. Could they be revived to live another day?
Thus began a deep dive into the Amiga font format. At the end of that process, and thanks to Node.js, I now have some font data in JSON format. Can we use font editing software to make use of this, and maybe even create new fonts from thirty-year-old data?
Choosing font editing software
There are a number of font editors available, and many are capable of being controlled by Python scripts. RoboFont, Glyphs and Fontlab seem to be the main contenders for this exercise. As a hobbyist I own Glyphs and Fontlab; owning two font editors is an extravagance but owning three is hard to justify.
We’ll choose Glyphs. Writing Python scripts for Glyphs has been a delight from start to finish and the scripting API documentation is excellent.
Making a start
Writing and running scripts in Glyphs is simple and can be done in your text editor of choice. Scripts are stored in the ~/Library/Application Support/Glyphs 3/Scripts folder so it’s just a matter of opening that folder up in, say, Visual Studio Code and you’re good to go.
Create a file named convertAmigaBitmapFont.py and add a header like the one below:
#MenuTitle: Convert Amiga Bitmap Font
# -*- coding: utf-8 -*-
__doc__="""
Converts Amiga Bitmap Font Data into a Glyphs font.
"""
Creating that header means that the script will become visible in the Scripts menu after a restart. From that menu you can run and rerun the script - or you can use the keyboard shortcut Cmd+Opt+R. To see any output from the script, open the scripting panel by selecting Window > Macro Panel from the menu.

So we now have quite a comfortable way of developing our scripts - save updates in Visual Studio Code, rerun the script from the menu or shortcut and see the output in the macro panel.
So can we write a script that creates an outline font from our JSON data? Yes we can! We’ll need to
- Read our JSON font data
- Create a new font in Glyphs
- Work out the style name (Regular, Bold etc) from the style flags
- Calculate the font metrics (ascender, x-height etc)
- For each glyph in turn:
- calculate the width
- build the glyph itself, drawing rectangles corresponding to each set pixel in the character data
- remove any overlaps to make a contiguous outline
- I won’t go through the entire script here - you can see it for yourself at https://github.com/smugpie/amiga-bitmap-font-tools/blob/main/glyphsapp/openAmigaJsonFont.py. But let’s pick out some of the highlights.
Reading JSON data
Python is able to open and read JSON files. Assuming we’ve stored our JSON data in a file called weblight32.afontjson, located in the same folder as our script, we can just do…
file = open(
    'weblight32.afontjson',
    encoding='utf-8'
)
amigaFont = json.load(file)
…and - hey presto! - our font data is available immediately in a dictionary called amigaFont.
Creating a new font
Creating a new font is a simple matter of making a new GSFont object and adding it to the Glyphs app. We’ll add a style name to the master while we’re here also.
glyphsFont = GSFont()
glyphsFont.familyName = amigaFont['name']
glyphsFont.upm = 1000
glyphsFont.descriptions['ENG'] = 'Converted by amiga-bitmap-font-tools'

Glyphs.fonts.append(glyphsFont)

master = glyphsFont.masters[0]
# Add a human readable style - not included here for brevity
master.name = getHumanReadableStyle(amigaFont['style'])
Getting metrics
Next, we need some metrics - we’ll need the ascender, cap height, x-height and descender. We can calculate these by looking at various characters in our pixel font and seeing where the character shape begins, i.e. the row where our array of bits contains one or more 1s.
But first we need to know how big our ‘pixels’ are going to be. We need to fit them all into a UPM height of 1000 so that’d be a good approximation.
fontSize = amigaFont['ySize']
baseline = amigaFont['baseline']
unitBlock = int(glyphsFont.upm / fontSize)
pixelsBelowBaseline = fontSize - baseline
Also some helper functions wouldn’t go amiss here:
# work out the height of a glyph in order to calculate dimensions
# like ascender, capHeight etc
def getHeight(glyphBitmap, fontSize, pixelsBelowBaseline):
    height = fontSize
    for row in glyphBitmap:
        if sum(row) > 0:
            break
        height -= 1

    return height - pixelsBelowBaseline + 1

# work out the depth of a glyph in order to calculate descender
def getDepth(glyphBitmap, pixelsBelowBaseline):
    reversedGlyphBitmap = list(reversed(glyphBitmap))
    height = 0
    for row in reversedGlyphBitmap:
        if sum(row) > 0:
            break
        height += 1

    return height - pixelsBelowBaseline + 1
Then, for example, we can use ‘x’ to work out the x-height.
# work out x-height from the letter x (ASCII code 120)
xHeight = getHeight(
    amigaFont['glyphs']['120']['bitmap'],
    fontSize,
    pixelsBelowBaseline
)
if xHeight > 0:
    master.xHeight = xHeight * unitBlock
Drawing rectangles
In order to convert our fonts, we need to turn the pixels in our fonts into shapes. We’ll create a function to draw rectangles to help us on our journey. In fact, one already exists online thanks to mekkablue’s script on GitHub - https://github.com/mekkablue/Glyphs-Scripts/blob/master/Paths/Fill%20Up%20with%20Rectangles.py.
def drawRect( myBottomLeft, myTopRight ):
    myRect = GSPath()
    myCoordinates = [
        [ myBottomLeft[0], myBottomLeft[1] ],
        [ myTopRight[0], myBottomLeft[1] ],
        [ myTopRight[0], myTopRight[1] ],
        [ myBottomLeft[0], myTopRight[1] ]
    ]

    for thisPoint in myCoordinates:
        newNode = GSNode()
        newNode.type = GSLINE
        newNode.position = ( thisPoint[0], thisPoint[1] )
        myRect.nodes.append( newNode )

    myRect.closed = True
    return myRect
Converting glyphs
We’ll now work through all the glyphs in turn. We’ll create a new GSGlyph for each Amiga glyph and append it to the font. We’ll find the layer and set the width. Then we’ll work through our rows and columns of bitmap data and draw a rectangle if the data is 1. Finally we’ll remove the overlaps between the rectangles.
for char, amigaGlyph in amigaFont['glyphs'].items():
        glyph = GSGlyph(amigaGlyph['character'])
        glyphsFont.glyphs.append(glyph)
        layer = glyph.layers[0]
        layer.width = (amigaGlyph['spacing'] + amigaGlyph['kerning']) * unitBlock

        for rowNumber, rowData in enumerate(amigaGlyph['bitmap']):
            rowPosition = fontSize - rowNumber - pixelsBelowBaseline
            for colNumber, colData in enumerate(rowData):
                colPosition = colNumber + amigaGlyph['kerning']
                if colData == 1:
                    bottomLeft = (colPosition * unitBlock, rowPosition * unitBlock)
                    topRight = ((colPosition + 1) * unitBlock, (rowPosition + 1) * unitBlock)
                    rect = drawRect(bottomLeft, topRight)
                    layer.shapes.append(rect)
            layer.removeOverlap()
Putting it all together
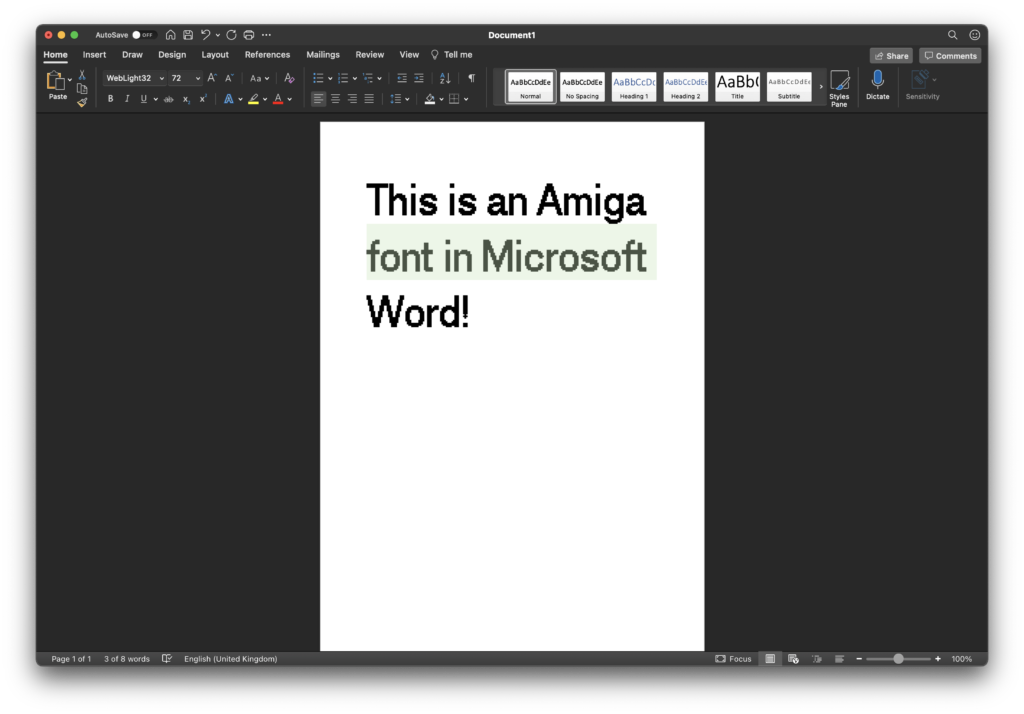
Does it work? Yes! Here’s WebLight/32 as a proper outline font in Glyphs:

And if we export the font, we can use my 1990s font (heavily influenced by Akzidenz Grotesk) in MS Word!
This has been a really fun project and it’s now really tempting to raid the Amiga archives at Aminet to see if there are some hidden treasures that would otherwise be lost.
UPDATE 03/07/2021: I’ve now written a a script that will allow you to open Amiga fonts directly from within Glyphs, with no JSON conversion needed, and no need to install Node.js! Head over to https://github.com/smugpie/amiga-bitmap-font-tools for more information.